[TOC]
1. 整体概念
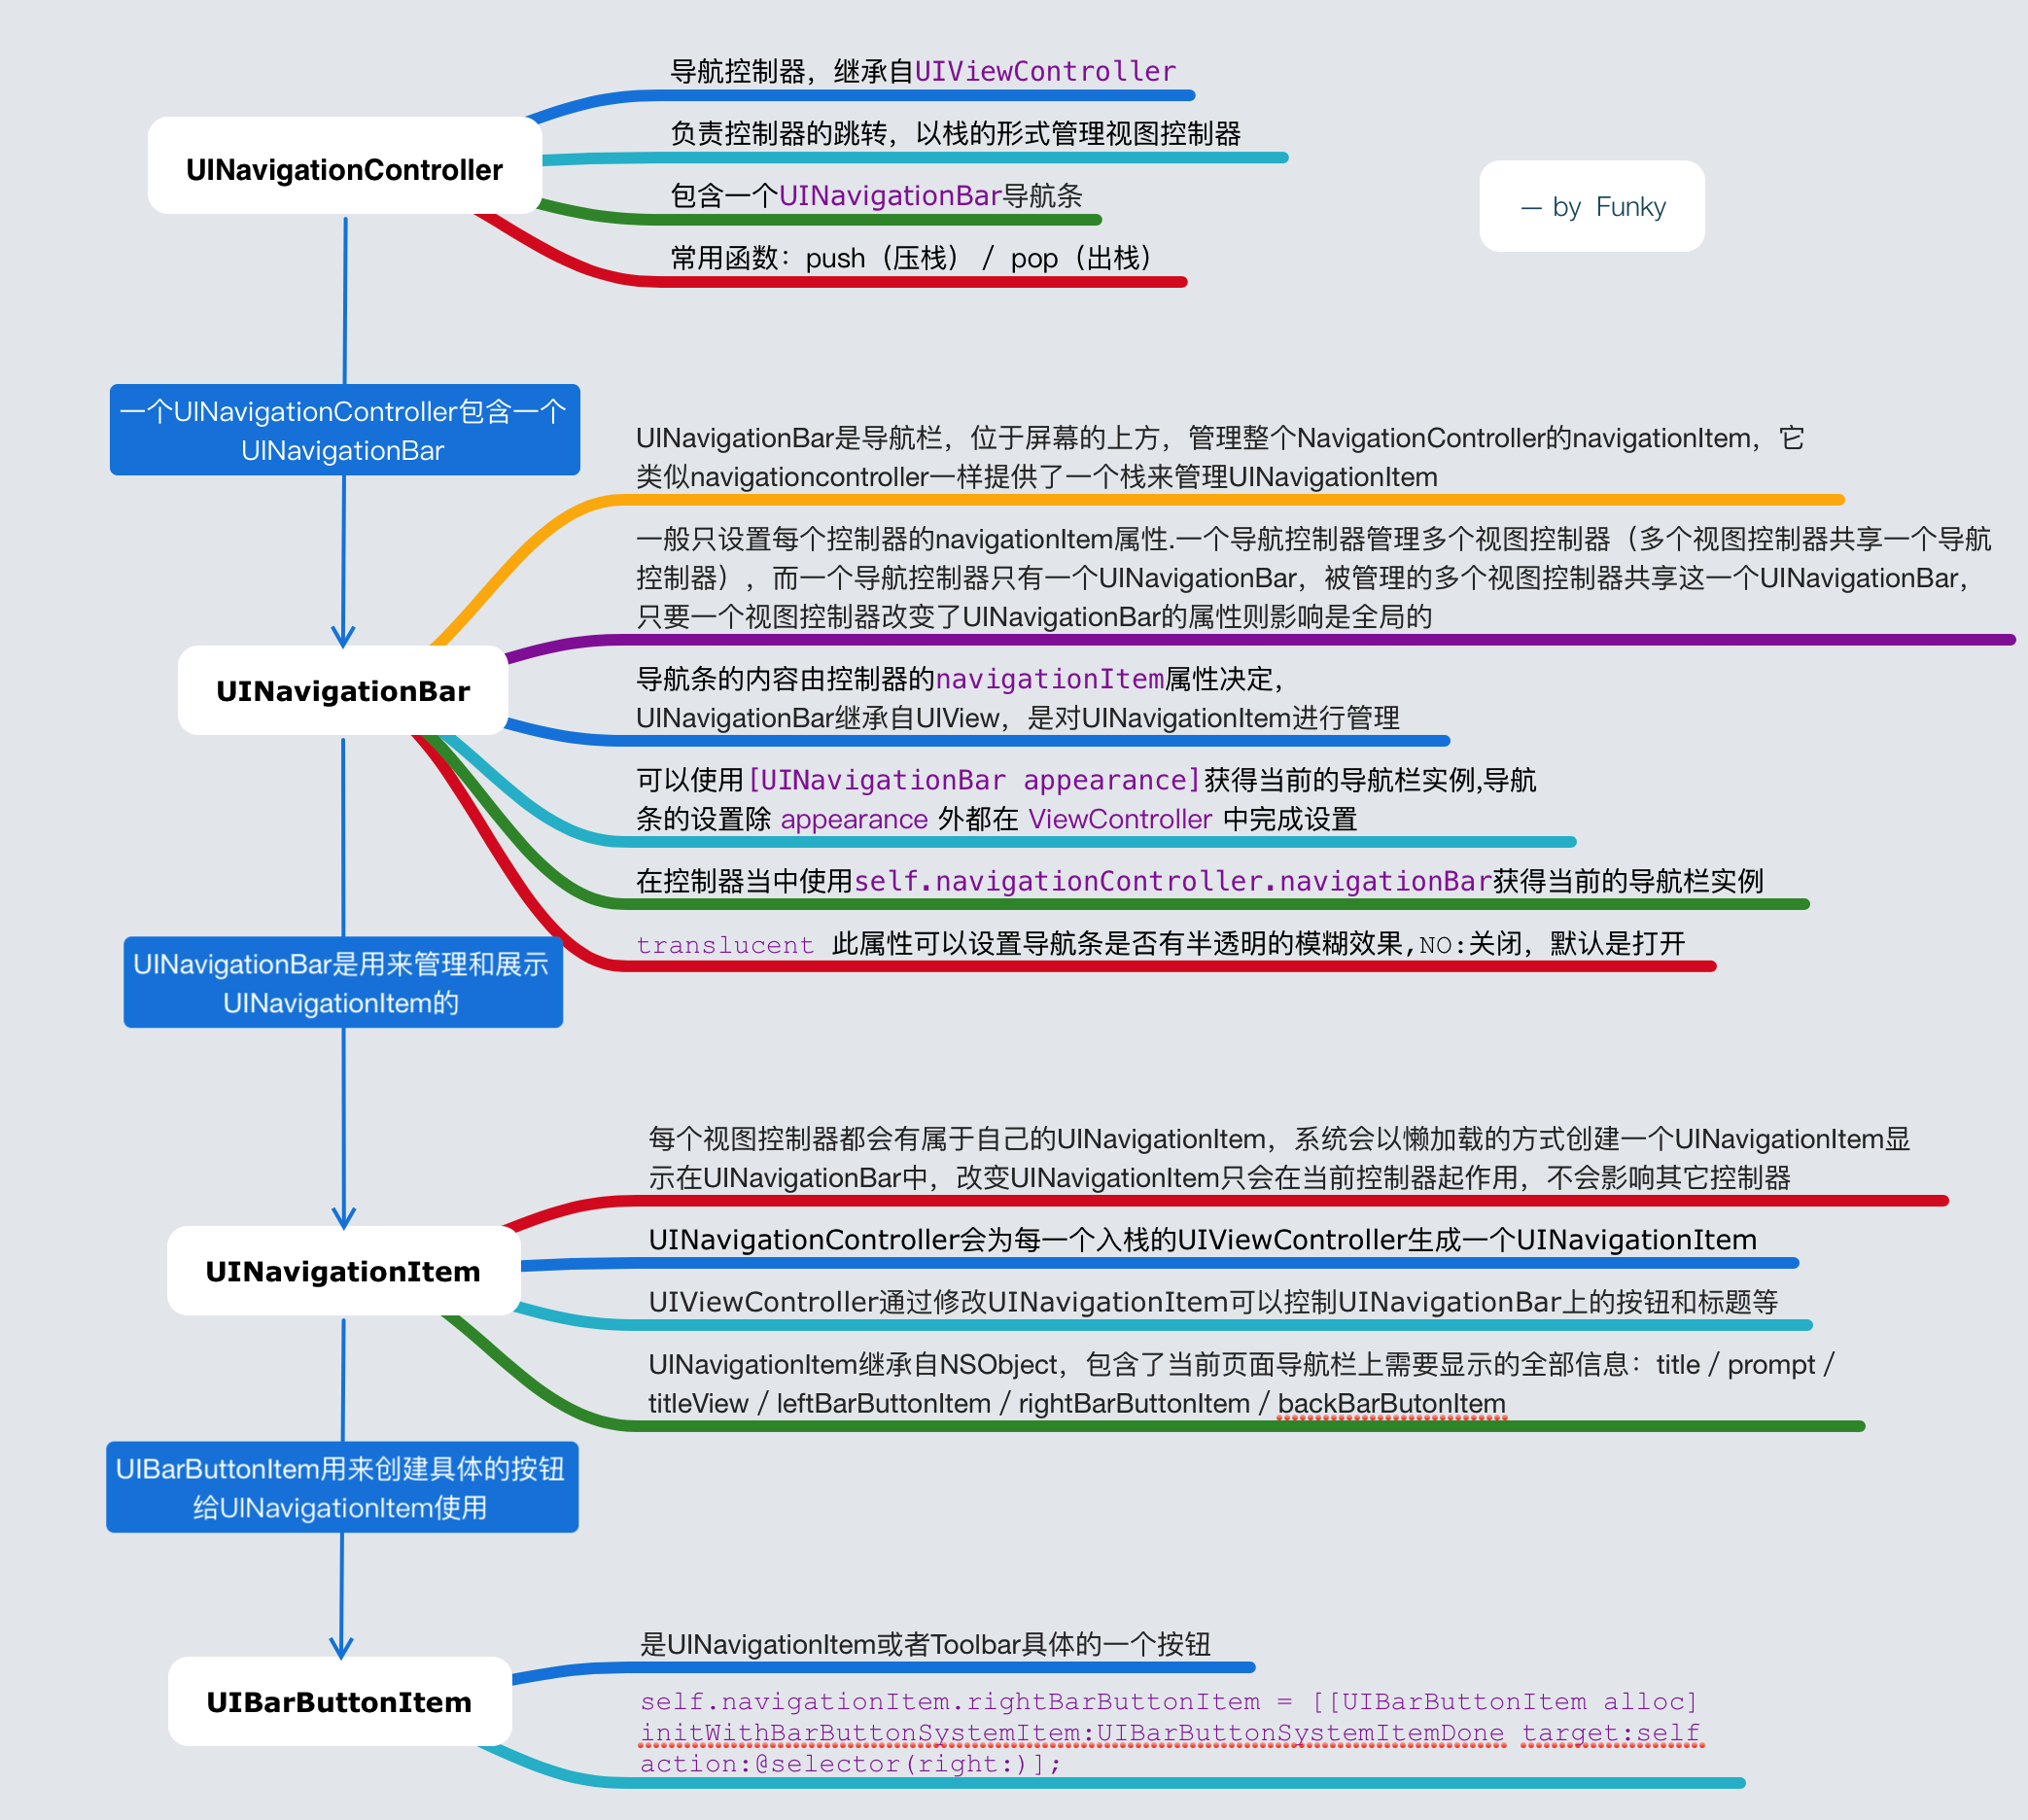
- 解释:
- UINavigationController是容器类的视图控制器,是UIViewController的子类,它以栈的形式管理一组视图控制器
ViewController,位于栈底的视图是导航控制器的根视图rootViewController - 每一个导航控制器都包含一个UINavigationBar导航栏,UINavigationBar是UIView的子类,UINavgationBar也可以单独使用,添加至任何的UIView中。在平时的应用程序中,我们常使用自定义UINavigationBar来完成导航条的设置;
- UINavigationController为每个UIViewController生成一个UINavigationItem,通过UINavigationItem可以改变导航栏(UINavigationBar)上得按钮和标题,UINavigationItem是显示在UINavigationBar上的,UINavigationBar管理着UINavigationItem;
- UINavigationItem上的按钮,又是由UIBarButtonItem初始化创建的;
- 每一个加到navigationController的viewController都会有一个对应的navigationItem,NavigationBar上的leftItem,rightItem,title是由当前的视图控制器的navigationItem控制的
- UINavigationController会为每一个入栈的UIViewController生成一个UINavigationItem. UIViewController通过修改UINavigationItem可以控制UINavigationBar上的按钮和标题等
- UINavigationController是容器类的视图控制器,是UIViewController的子类,它以栈的形式管理一组视图控制器
2. API注释
2.1. UINavigationController
NS_CLASS_AVAILABLE_IOS(2_0) @interface UINavigationController : UIViewController


// UINavigationController初始化,自定义NavigationBar,自定义toolbar
- (instancetype)initWithNavigationBarClass:(nullable Class)navigationBarClass toolbarClass:(nullable Class)toolbarClass NS_AVAILABLE_IOS(5_0);

// 以一个viewController为栈底(导航控制器的根控制器),实例化一个navigationController
- (instancetype)initWithRootViewController:(UIViewController *)rootViewController;

// 压栈:将目标控制器压入栈中
- (void)pushViewController:(UIViewController *)viewController animated:(BOOL)animated;

// 出栈:栈顶控制器出栈
- (nullable UIViewController *)popViewControllerAnimated:(BOOL)animated;

// 出栈:pop到指定的目标控制器
- (nullable NSArray<__kindof UIViewController *> *)popToViewController:(UIViewController *)viewController animated:(BOOL)animated;

// 出栈:pop到根控制器
- (nullable NSArray<__kindof UIViewController *> *)popToRootViewControllerAnimated:(BOOL)animated;

// 导航栈的栈顶控制器只读
@property(nullable, nonatomic,readonly,strong) UIViewController *topViewController;

// 当前显示的控制器 只读 visibleViewController和哪个导航栈没有关系,只是当前显示的控制器,任意一个导航的visibleViewController所返回的值应该是一样的,(如果模态viewcontroller存在,返回模态viewcontroller,否则栈顶viewcontroller)
@property(nullable, nonatomic,readonly,strong) UIViewController *visibleViewController;

// 栈里的视图控制器数组
@property(nonatomic,copy) NSArray<__kindof UIViewController *> *viewControllers;

// 替换栈中的视图控制器数组,animated=YES,根据当前的栈顶viewcontroller在不在这个viewcontroller数组中,模拟一次push和pop的动画。相当于对当前的栈进行了一次整体的刷新
- (void)setViewControllers:(NSArray<UIViewController *> *)viewControllers animated:(BOOL)animated NS_AVAILABLE_IOS(3_0);

// 是否隐藏导航栏
@property(nonatomic,getter=isNavigationBarHidden) BOOL navigationBarHidden;

// 设置导航栏隐藏 是否有动画
- (void)setNavigationBarHidden:(BOOL)hidden animated:(BOOL)animated;

// 导航栏
@property(nonatomic,readonly) UINavigationBar *navigationBar;

// toolbar是否隐藏
@property(nonatomic,getter=isToolbarHidden) BOOL toolbarHidden NS_AVAILABLE_IOS(3_0) __TVOS_PROHIBITED;

// toolbar是否隐藏 是否有动画
- (void)setToolbarHidden:(BOOL)hidden animated:(BOOL)animated NS_AVAILABLE_IOS(3_0) __TVOS_PROHIBITED;

// toolbar对象
@property(null_resettable,nonatomic,readonly) UIToolbar *toolbar NS_AVAILABLE_IOS(3_0) __TVOS_PROHIBITED;

// 委托,可以在压栈出栈操作中,设置一些动画,以及一些额外的操作
@property(nullable, nonatomic, weak) id<UINavigationControllerDelegate> delegate;

// 边缘侧滑返回手势
@property(nullable, nonatomic, readonly) UIGestureRecognizer *interactivePopGestureRecognizer NS_AVAILABLE_IOS(7_0) __TVOS_PROHIBITED;

// 展示视图控制器
- (void)showViewController:(UIViewController *)vc sender:(nullable id)sender NS_AVAILABLE_IOS(8_0); // Interpreted as pushViewController:animated:

// 输入键盘出现时将导航栏隐藏 IOS8特性
@property (nonatomic, readwrite, assign) BOOL hidesBarsWhenKeyboardAppears NS_AVAILABLE_IOS(8_0) __TVOS_PROHIBITED;

// 滚动页面时隐藏Bar  IOS8特性
@property (nonatomic, readwrite, assign) BOOL hidesBarsOnSwipe NS_AVAILABLE_IOS(8_0) __TVOS_PROHIBITED;

// 获取能够隐藏navigationBar的滑动手势 只读
@property (nonatomic, readonly, strong) UIPanGestureRecognizer *barHideOnSwipeGestureRecognizer NS_AVAILABLE_IOS(8_0) __TVOS_PROHIBITED;

// 当设置为true时,横向方向时隐藏NavigationBar
@property (nonatomic, readwrite, assign) BOOL hidesBarsWhenVerticallyCompact NS_AVAILABLE_IOS(8_0) __TVOS_PROHIBITED;

// 当设置为true时,如果有没处理的点击手势就会隐藏navigationBar
@property (nonatomic, readwrite, assign) BOOL hidesBarsOnTap NS_AVAILABLE_IOS(8_0) __TVOS_PROHIBITED;

// 获取能够隐藏navigationBar的点击手势 只读
@property (nonatomic, readonly, assign) UITapGestureRecognizer *barHideOnTapGestureRecognizer NS_AVAILABLE_IOS(8_0) __TVOS_PROHIBITED;

@end
2.2. UINavigationControllerDelegate
@protocol UINavigationControllerDelegate <NSObject>

@optional

// 将要显示目标控制器
- (void)navigationController:(UINavigationController *)navigationController willShowViewController:(UIViewController *)viewController animated:(BOOL)animated;

// 目标控制器最终显示
- (void)navigationController:(UINavigationController *)navigationController didShowViewController:(UIViewController *)viewController animated:(BOOL)animated;

// 横竖屏切换
- (UIInterfaceOrientationMask)navigationControllerSupportedInterfaceOrientations:(UINavigationController *)navigationController NS_AVAILABLE_IOS(7_0) __TVOS_PROHIBITED;

// 横竖屏切换
- (UIInterfaceOrientation)navigationControllerPreferredInterfaceOrientationForPresentation:(UINavigationController *)navigationController NS_AVAILABLE_IOS(7_0) __TVOS_PROHIBITED;

// 转场动画
- (nullable id <UIViewControllerInteractiveTransitioning>)navigationController:(UINavigationController *)navigationController
interactionControllerForAnimationController:(id <UIViewControllerAnimatedTransitioning>) animationController NS_AVAILABLE_IOS(7_0);

// 转场动画
- (nullable id <UIViewControllerAnimatedTransitioning>)navigationController:(UINavigationController *)navigationController
animationControllerForOperation:(UINavigationControllerOperation)operation
fromViewController:(UIViewController *)fromVC
toViewController:(UIViewController *)toVC  NS_AVAILABLE_IOS(7_0);

@end
2.3. UIViewController (UINavigationControllerItem)分类
@interface UIViewController (UINavigationControllerItem)

// NavigationBar上的自定义视图(title/titleView等)
@property(nonatomic,readonly,strong) UINavigationItem *navigationItem;

// push时是否隐藏bottomBar
@property(nonatomic) BOOL hidesBottomBarWhenPushed __TVOS_PROHIBITED;

// 视图的导航控制器
@property(nullable, nonatomic,readonly,strong) UINavigationController *navigationController;

@end
2.4. UIViewController (UINavigationControllerContextualToolbarItems)分类
@interface UIViewController (UINavigationControllerContextualToolbarItems)

// 设置工具条中包含的按钮
@property (nullable, nonatomic, strong) NSArray<__kindof UIBarButtonItem *> *toolbarItems NS_AVAILABLE_IOS(3_0) __TVOS_PROHIBITED;
- (void)setToolbarItems:(nullable NSArray<UIBarButtonItem *> *)toolbarItems animated:(BOOL)animated NS_AVAILABLE_IOS(3_0) __TVOS_PROHIBITED;

@end
2.5. UINavigationBar
NS_CLASS_AVAILABLE_IOS(2_0) @interface UINavigationBar : UIView <NSCoding, UIBarPositioning>

// 设置导航条类型
/*
UIBarStyleDefault  白色半透明,默认,不设置时默认为白色半透明
UIBarStyleBlack    灰色半透明
*/
@property(nonatomic,assign) UIBarStyle barStyle;

@property(nullable,nonatomic,weak) id<UINavigationBarDelegate> delegate;

// translucent设置是否透明,设置成YES会有一种模糊效果,Default is NO on iOS 6 and earlier. Always YES if barStyle is set to UIBarStyleBlackTranslucent
@property(nonatomic,assign,getter=isTranslucent) BOOL translucent NS_AVAILABLE_IOS(3_0) UI_APPEARANCE_SELECTOR;

//UINavigationBar上面不只是简单的显示标题,它也将标题进行了堆栈的管理,每一个标题抽象为的对象在iOS系统中是UINavigationItem对象,我们可以通过push与pop操作管理item组。
//向栈中添加一个item,上一个item会被推向导航栏的左侧,变为pop按钮,会有一个动画效果
- (void)pushNavigationItem:(UINavigationItem *)item animated:(BOOL)animated;

//pop一个item
- (nullable UINavigationItem *)popNavigationItemAnimated:(BOOL)animated;

//当前push到最上层的item
@property(nullable, nonatomic,readonly,strong) UINavigationItem *topItem;

//仅次于最上层的item,一般式被推向导航栏左侧的item
@property(nullable, nonatomic,readonly,strong) UINavigationItem *backItem;

//获取堆栈中所有item的数组
@property(nullable,nonatomic,copy) NSArray<UINavigationItem *> *items;

//设置一组item
- (void)setItems:(nullable NSArray<UINavigationItem *> *)items animated:(BOOL)animated;

//系统类型按钮文字颜色
@property(null_resettable, nonatomic,strong) UIColor *tintColor;

//通过barTintColor来设置背景色
@property(nullable, nonatomic,strong) UIColor *barTintColor NS_AVAILABLE_IOS(7_0) UI_APPEARANCE_SELECTOR;

//设置工具栏背景和阴影图案
- (void)setBackgroundImage:(nullable UIImage *)backgroundImage forBarPosition:(UIBarPosition)barPosition barMetrics:(UIBarMetrics)barMetrics NS_AVAILABLE_IOS(7_0) UI_APPEARANCE_SELECTOR;
- (nullable UIImage *)backgroundImageForBarPosition:(UIBarPosition)barPosition barMetrics:(UIBarMetrics)barMetrics NS_AVAILABLE_IOS(7_0) UI_APPEARANCE_SELECTOR;

//通过背景图片来设置导航栏的外观
- (void)setBackgroundImage:(nullable UIImage *)backgroundImage forBarMetrics:(UIBarMetrics)barMetrics NS_AVAILABLE_IOS(5_0) UI_APPEARANCE_SELECTOR;

- (nullable UIImage *)backgroundImageForBarMetrics:(UIBarMetrics)barMetrics NS_AVAILABLE_IOS(5_0) UI_APPEARANCE_SELECTOR;

//背景阴影图片 - 即分割线
@property(nullable, nonatomic,strong) UIImage *shadowImage NS_AVAILABLE_IOS(6_0) UI_APPEARANCE_SELECTOR;

//标题的富文本
@property(nullable,nonatomic,copy) NSDictionary<NSString *,id> *titleTextAttributes NS_AVAILABLE_IOS(5_0) UI_APPEARANCE_SELECTOR;

//标题垂直偏移
- (void)setTitleVerticalPositionAdjustment:(CGFloat)adjustment forBarMetrics:(UIBarMetrics)barMetrics NS_AVAILABLE_IOS(5_0) UI_APPEARANCE_SELECTOR;

- (CGFloat)titleVerticalPositionAdjustmentForBarMetrics:(UIBarMetrics)barMetrics NS_AVAILABLE_IOS(5_0) UI_APPEARANCE_SELECTOR;

//设置返回按钮的图片
@property(nullable,nonatomic,strong) UIImage *backIndicatorImage NS_AVAILABLE_IOS(7_0) UI_APPEARANCE_SELECTOR;
@property(nullable,nonatomic,strong) UIImage *backIndicatorTransitionMaskImage NS_AVAILABLE_IOS(7_0) UI_APPEARANCE_SELECTOR;

@end
2.6. UINavigationItem
NS_CLASS_AVAILABLE_IOS(2_0) @interface UINavigationItem : NSObject <NSCoding>

- (instancetype)initWithTitle:(NSString *)title NS_DESIGNATED_INITIALIZER;

- (nullable instancetype)initWithCoder:(NSCoder *)coder NS_DESIGNATED_INITIALIZER;

//设置导航栏中间的内容标题
@property(nullable, nonatomic,copy)   NSString *title;

//设置导航栏中间的内容视图
@property(nullable, nonatomic,strong) UIView *titleView;

@property(nullable,nonatomic,copy)   NSString *prompt;

//返回
@property(nullable,nonatomic,strong) UIBarButtonItem *backBarButtonItem;

//是否隐藏返回Button
@property(nonatomic,assign) BOOL hidesBackButton;

- (void)setHidesBackButton:(BOOL)hidesBackButton animated:(BOOL)animated;

//左边数组Item
@property(nullable,nonatomic,copy) NSArray<UIBarButtonItem *> *leftBarButtonItems NS_AVAILABLE_IOS(5_0);

//右边数组Item
@property(nullable,nonatomic,copy) NSArray<UIBarButtonItem *> *rightBarButtonItems NS_AVAILABLE_IOS(5_0);

- (void)setLeftBarButtonItems:(nullable NSArray<UIBarButtonItem *> *)items animated:(BOOL)animated NS_AVAILABLE_IOS(5_0);

- (void)setRightBarButtonItems:(nullable NSArray<UIBarButtonItem *> *)items animated:(BOOL)animated NS_AVAILABLE_IOS(5_0);

//通过指定该属性为YES,可以让leftBarButtonItem和backBarButtonItem同时显示,其中leftBarButtonItem显示在backBarButtonItem的右边 默认值为NO
@property(nonatomic) BOOL leftItemsSupplementBackButton NS_AVAILABLE_IOS(5_0);

//左边Item
@property(nullable, nonatomic,strong) UIBarButtonItem *leftBarButtonItem;

//右边Item
@property(nullable, nonatomic,strong) UIBarButtonItem *rightBarButtonItem;

- (void)setLeftBarButtonItem:(nullable UIBarButtonItem *)item animated:(BOOL)animated;

- (void)setRightBarButtonItem:(nullable UIBarButtonItem *)item animated:(BOOL)animated;

@end
2.7. UIBarButtonItem
NS_CLASS_AVAILABLE_IOS(2_0) @interface UIBarButtonItem : UIBarItem <NSCoding>

- (instancetype)init NS_DESIGNATED_INITIALIZER;
//初始化
- (nullable instancetype)initWithCoder:(NSCoder *)aDecoder NS_DESIGNATED_INITIALIZER;
- (instancetype)initWithImage:(nullable UIImage *)image style:(UIBarButtonItemStyle)style target:(nullable id)target action:(nullable SEL)action;
- (instancetype)initWithImage:(nullable UIImage *)image landscapeImagePhone:(nullable UIImage *)landscapeImagePhone style:(UIBarButtonItemStyle)style target:(nullable id)target action:(nullable SEL)action NS_AVAILABLE_IOS(5_0);
- (instancetype)initWithTitle:(nullable NSString *)title style:(UIBarButtonItemStyle)style target:(nullable id)target action:(nullable SEL)action;
- (instancetype)initWithBarButtonSystemItem:(UIBarButtonSystemItem)systemItem target:(nullable id)target action:(nullable SEL)action;
//自定义视图
- (instancetype)initWithCustomView:(UIView *)customView;

//样式
@property(nonatomic)         UIBarButtonItemStyle style;            // default is UIBarButtonItemStylePlain
@property(nonatomic)         CGFloat              width;
@property(nullable, nonatomic,copy)    NSSet<NSString *>   *possibleTitles;   // default is nil

//自定义视图
@property(nullable, nonatomic,strong)  __kindof UIView     *customView;
@property(nullable, nonatomic)         SEL                  action;           // default is NULL
@property(nullable, nonatomic,weak)    id                   target;           // default is nil

- (void)setBackgroundImage:(nullable UIImage *)backgroundImage forState:(UIControlState)state barMetrics:(UIBarMetrics)barMetrics NS_AVAILABLE_IOS(5_0) UI_APPEARANCE_SELECTOR;
- (nullable UIImage *)backgroundImageForState:(UIControlState)state barMetrics:(UIBarMetrics)barMetrics NS_AVAILABLE_IOS(5_0) UI_APPEARANCE_SELECTOR;


- (void)setBackgroundImage:(nullable UIImage *)backgroundImage forState:(UIControlState)state style:(UIBarButtonItemStyle)style barMetrics:(UIBarMetrics)barMetrics NS_AVAILABLE_IOS(6_0) UI_APPEARANCE_SELECTOR;
- (nullable UIImage *)backgroundImageForState:(UIControlState)state style:(UIBarButtonItemStyle)style barMetrics:(UIBarMetrics)barMetrics NS_AVAILABLE_IOS(6_0) UI_APPEARANCE_SELECTOR;

@property(nullable, nonatomic,strong) UIColor *tintColor NS_AVAILABLE_IOS(5_0);


- (void)setBackgroundVerticalPositionAdjustment:(CGFloat)adjustment forBarMetrics:(UIBarMetrics)barMetrics NS_AVAILABLE_IOS(5_0) UI_APPEARANCE_SELECTOR;
- (CGFloat)backgroundVerticalPositionAdjustmentForBarMetrics:(UIBarMetrics)barMetrics NS_AVAILABLE_IOS(5_0) UI_APPEARANCE_SELECTOR;


- (void)setTitlePositionAdjustment:(UIOffset)adjustment forBarMetrics:(UIBarMetrics)barMetrics NS_AVAILABLE_IOS(5_0) UI_APPEARANCE_SELECTOR;
- (UIOffset)titlePositionAdjustmentForBarMetrics:(UIBarMetrics)barMetrics NS_AVAILABLE_IOS(5_0) UI_APPEARANCE_SELECTOR;

- (void)setBackButtonBackgroundImage:(nullable UIImage *)backgroundImage forState:(UIControlState)state barMetrics:(UIBarMetrics)barMetrics NS_AVAILABLE_IOS(5_0) UI_APPEARANCE_SELECTOR;
- (nullable UIImage *)backButtonBackgroundImageForState:(UIControlState)state barMetrics:(UIBarMetrics)barMetrics NS_AVAILABLE_IOS(5_0) UI_APPEARANCE_SELECTOR;

- (void)setBackButtonTitlePositionAdjustment:(UIOffset)adjustment forBarMetrics:(UIBarMetrics)barMetrics NS_AVAILABLE_IOS(5_0) UI_APPEARANCE_SELECTOR;
- (UIOffset)backButtonTitlePositionAdjustmentForBarMetrics:(UIBarMetrics)barMetrics NS_AVAILABLE_IOS(5_0) UI_APPEARANCE_SELECTOR;


- (void)setBackButtonBackgroundVerticalPositionAdjustment:(CGFloat)adjustment forBarMetrics:(UIBarMetrics)barMetrics NS_AVAILABLE_IOS(5_0) UI_APPEARANCE_SELECTOR;
- (CGFloat)backButtonBackgroundVerticalPositionAdjustmentForBarMetrics:(UIBarMetrics)barMetrics NS_AVAILABLE_IOS(5_0) UI_APPEARANCE_SELECTOR;

@end


typedef NS_ENUM(NSInteger, UIBarButtonSystemItem) {
    UIBarButtonSystemItemDone,//显示完成
    UIBarButtonSystemItemCancel,//显示取消
    UIBarButtonSystemItemEdit,  //显示编辑
    UIBarButtonSystemItemSave, //显示保存
    UIBarButtonSystemItemAdd,//显示加号
    UIBarButtonSystemItemFlexibleSpace,//什么都不显示,占位一个空间位置
    UIBarButtonSystemItemFixedSpace,//和上一个类似
    UIBarButtonSystemItemCompose,//显示写入按钮
    UIBarButtonSystemItemReply,//显示循环按钮
    UIBarButtonSystemItemAction,//显示活动按钮
    UIBarButtonSystemItemOrganize,//显示组合按钮
    UIBarButtonSystemItemBookmarks,//显示图书按钮
    UIBarButtonSystemItemSearch,//显示查找按钮
    UIBarButtonSystemItemRefresh,//显示刷新按钮
    UIBarButtonSystemItemStop,//显示停止按钮
    UIBarButtonSystemItemCamera,//显示相机按钮
    UIBarButtonSystemItemTrash,//显示移除按钮
    UIBarButtonSystemItemPlay,//显示播放按钮
    UIBarButtonSystemItemPause,//显示暂停按钮
    UIBarButtonSystemItemRewind,//显示退后按钮
    UIBarButtonSystemItemFastForward,//显示前进按钮
    UIBarButtonSystemItemUndo,//显示消除按钮
    UIBarButtonSystemItemRedo ,//显示重做按钮
    UIBarButtonSystemItemPageCurl ,//在tool上有效
};
3. 具体功能效果的实现
3.1 系统导航条默认样式
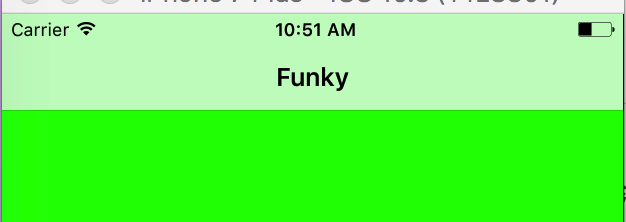
AppDelegate.m
- (BOOL)application:(UIApplication *)application didFinishLaunchingWithOptions:(NSDictionary *)launchOptions {

    self.window = [[UIWindow alloc]initWithFrame:[UIScreen mainScreen].bounds];
    self.window.backgroundColor = [UIColor redColor];

    ViewController *vc = [[ViewController alloc]init];
    UINavigationController *nav = [[UINavigationController alloc]initWithRootViewController:vc];
    self.window.rootViewController = nav;
    [self.window makeKeyAndVisible];
    return YES;
}
ViewController.m
- (void)viewDidLoad {
    [super viewDidLoad];

    self.title = @"Funky";
    self.view.backgroundColor = [UIColor greenColor];
}
样式如下图所示:
3.2 状态栏前景和背景色的设置
- 3.2.1 设置状态栏的前景部分(信号 & 时间 & 电池…的颜色)
只能设置两种颜色,默认的是黑色(UIStatusBarStyleDefault), 白色(UIStatusBarStyleLightContent)
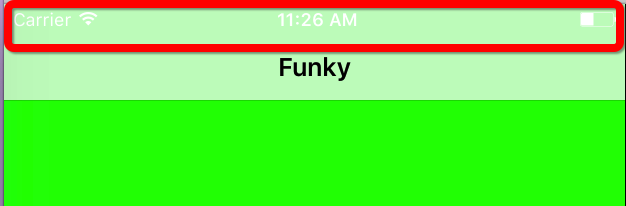
- 设置启动页状态条的前景颜色
- 设置启动后的导航条前景颜色
方法一:
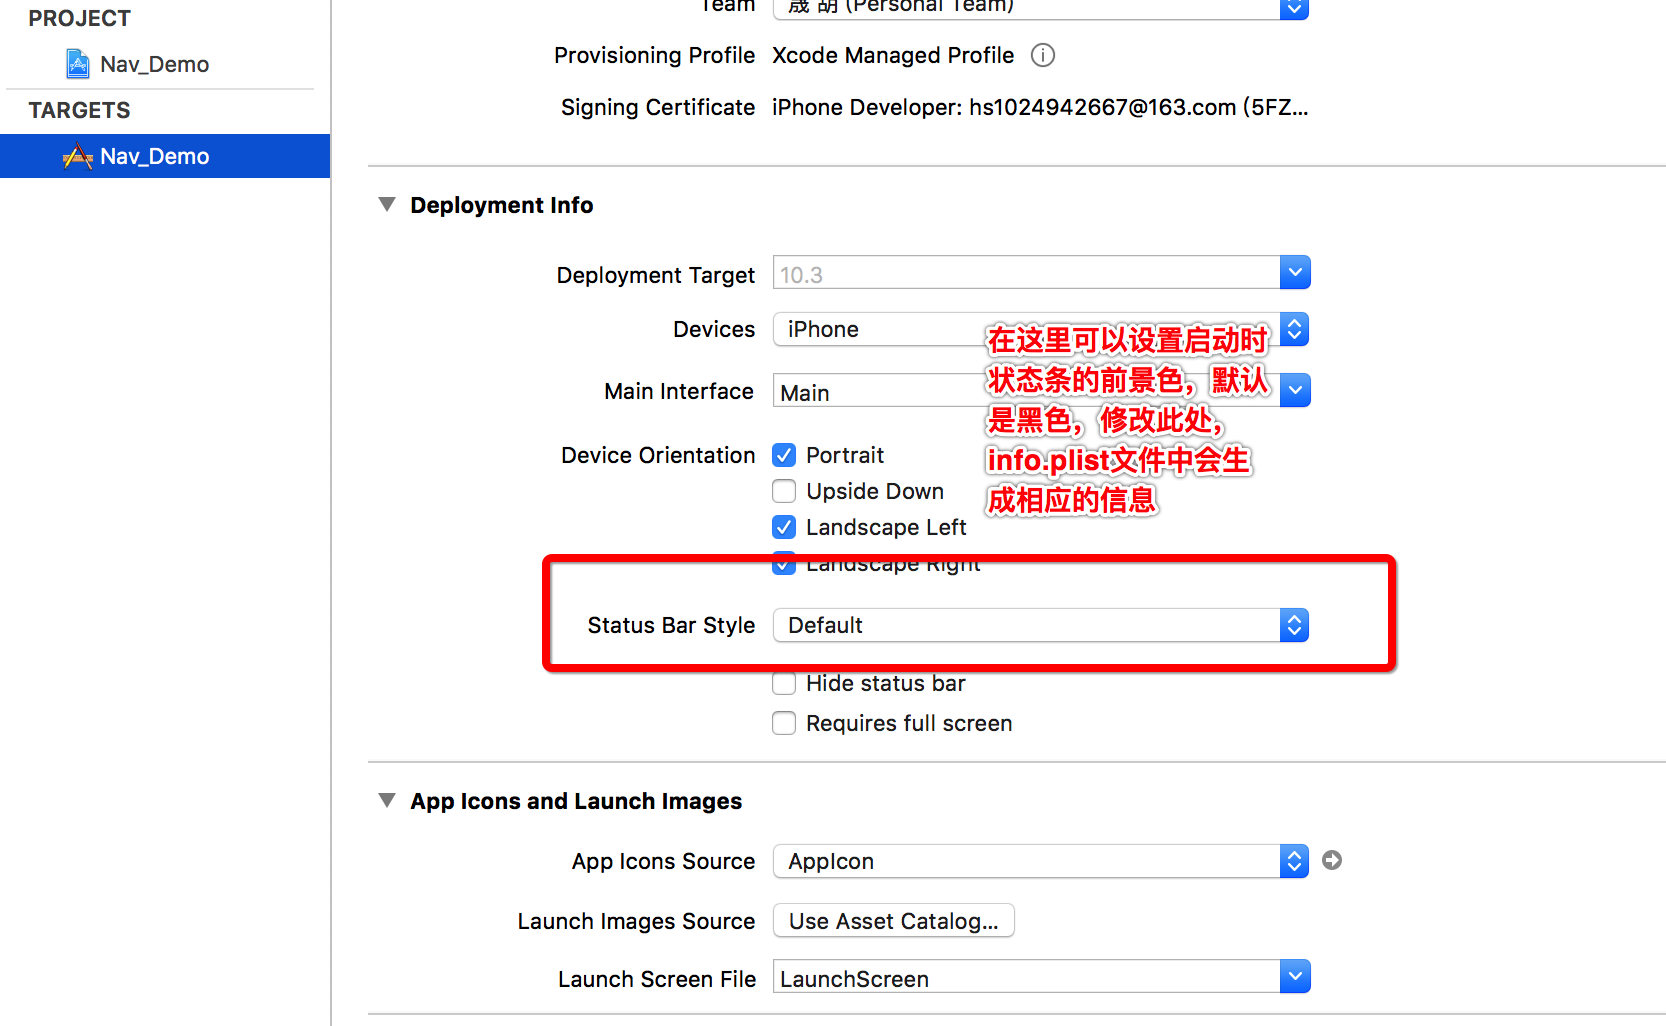
1.在Info.plist中将 View controller-based status bar appearance 设置为 NO
2.在ViewController.m*中 添加如下代码
- (void)viewDidLoad {
    [super viewDidLoad];

    self.title = @"Funky";
    self.view.backgroundColor = [UIColor greenColor];

    // 将状态栏的前景部分设置为白色
    [UIApplication sharedApplication].statusBarStyle = UIStatusBarStyleLightContent;
}
方法二:(隐藏导航条)
1.在Info.plist中将 View controller-based status bar appearance 设置为 YES
2.在ViewController.m 中 添加如下代码
- (void)viewDidLoad {
    [super viewDidLoad];

    self.title = @"Funky";
    self.view.backgroundColor = [UIColor greenColor];

    // 隐藏导航条 preferredStatusBarStyle 才能被调用
    self.navigationController.navigationBarHidden=YES;

}
-(UIStatusBarStyle)preferredStatusBarStyle {
    return UIStatusBarStyleLightContent;
}
方法三:(不隐藏导航条)
1.在Info.plist中将 View controller-based status bar appearance 设置为 YES
2.在ViewController.m 中 添加如下代码
- (void)viewDidLoad {
    [super viewDidLoad];

    self.title = @"Funky";
    self.view.backgroundColor = [UIColor greenColor];
}
-(UIStatusBarStyle)preferredStatusBarStyle {
    return UIStatusBarStyleLightContent;
}
3.在自定义的导航控制器.m文件中添加如下的代码
- (UIViewController *)childViewControllerForStatusBarStyle{
    return self.topViewController;
}
- 3.2.2 设置状态栏的背景颜色
方法一:
通过UINavigationBar 的属性直接更改navBar的颜色,从而改变状态栏的背景颜色
self.navigationController.navigationBar.barTintColor = [UIColor blueColor];
方法二:
调用自定义方法 [self setStatusBarBackgroundColor:[UIColor blueColor]];
//设置状态栏颜色
- (void)setStatusBarBackgroundColor:(UIColor *)color {

    UIView *statusBar = [[[UIApplication sharedApplication] valueForKey:@"statusBarWindow"] valueForKey:@"statusBar"];
    if ([statusBar respondsToSelector:@selector(setBackgroundColor:)]) {
        statusBar.backgroundColor = color;
    }
}
方法三:
由于状态栏区域上的控件是隐藏的,只要在状态栏区域渲染了颜色,状态栏的背景颜色就跟着一起改变,从而改变状态栏的背景颜色
UIView *statusBarView = [[UIView alloc]   initWithFrame:CGRectMake(0, -20, self.view.bounds.size.width, 20)];
statusBarView.backgroundColor = [UIColor blueColor];
[self.navigationController.navigationBar addSubview:statusBarView];
3.3 导航栏UINavigationBar属性设置
- 3.3.1 在AppDelegate中设置导航栏主题
// appearance 用于对没有创建的控件进行统一设置,无法对已经创建的控件进行设置
- (void)setNavigationControllerAppearance {

    // barTintColor:设置导航栏的整体背景颜色,包括状态栏的背景颜色
    [[UINavigationBar appearance]setBarTintColor:[UIColor yellowColor]];


    // tintColor:设置导航栏的按钮的图标和文字颜色(系统提供的),自定义的不在此范围
    [[UINavigationBar appearance] setTintColor:[UIColor blueColor]];


    // 设置导航条类型
    /*
    UIBarStyleDefault  白色半透明,默认的
    UIBarStyleBlack    灰色半透明,会影响状态栏的颜色以及导航栏的标题颜色。但是已经对标题的字体颜色都已经赋值的,就不受影响了
    */
    [UINavigationBar appearance].barStyle  = UIBarStyleBlack;


    //titleTextAttributes:设置导航栏的标题的显示样式,包括UITextAttributeFont - 字体 UITextAttributeTextColor - 文字颜色  UITextAttributeTextShadowColor - 文字阴影颜色    UITextAttributeTextShadowOffset - 偏移用于文本阴影
    //[UINavigationBar appearance].titleTextAttributes = @{NSFontAttributeName:[UIFont boldSystemFontOfSize:20], NSForegroundColorAttributeName:[UIColor yellowColor]};
    [[UINavigationBar appearance]setTitleTextAttributes:[NSDictionary dictionaryWithObjectsAndKeys:[UIColor redColor], NSForegroundColorAttributeName,[UIFont systemFontOfSize:18.f], NSFontAttributeName,nil]];


    //backgroundImage/shadowImage:设置导航栏的背景和阴影图片
    [[UINavigationBar appearance]setBackgroundImage:[UIImage imageNamed:@"navbg2.png"] forBarMetrics:UIBarMetricsDefault];
    [[UINavigationBar appearance]setShadowImage:[UIImage imageNamed:@"navbg.png"]];


    // translucent:BOOL,半透明效果
    [UINavigationBar appearance].translucent = NO;

}
- 3.3.2 在ViewController中设置导航栏主题
-(void)setupNavigationBarStyle {

    // 设置导航条类型  灰色半透明(UIBarStyleBlack),可以使title,及状态栏的前景色变成白色
    self.navigationController.navigationBar.barStyle = UIBarStyleBlack;


    // 设置按钮文字颜色,默认为蓝色,在 iOS6 中是设置背景颜色
    self.navigationController.navigationBar.tintColor = [UIColor redColor];


    // 设置导航条背景颜色,默认为白色半透明
    self.navigationController.navigationBar.barTintColor = [UIColor greenColor];


    // 设置导航条的背景图片,如果图片的高正好是 44,图片与整个导航的高重合,这时候最上面 20 的状态条回到 iOS6 以前的效果变成黑色的;如果图片的高不是 44,哪怕比 44 多一个像素 45,这时候图片往上拉伸,占据状态栏的 20,这时整个高度为 64。
    [self.navigationController.navigationBar setBackgroundImage:[UIImage imageNamed:@"navbg2"] forBarMetrics:UIBarMetricsDefault];


    // 设置导航条是否半透明
    self.navigationController.navigationBar.translucent = NO;
    [[[self.navigationController.navigationBar subviews] objectAtIndex:0] setAlpha:1];


    // 设置是否隐藏导航视图控制器
    self.navigationController.navigationBarHidden = NO;

}
3.4 UINavigationItem(导航栏上的按钮等)的设置及使用
-(void)setupNavigationItemStyle {

    // 设置导航栏提示内容,该模式将高度扩展了 30 像素(很少用)
    self.navigationItem.prompt = @"提示内容";


    // 设置导航栏标题
    self.navigationItem.title = @"Funky";


    // 设置自定义标题视图 x,y,width 设置无效
    //self.navigationItem.titleView = [[UIImageView alloc] initWithImage:[UIImage imageNamed:@"navbg2.png"]];
    UIImageView *imageView = [[UIImageView alloc] initWithFrame:CGRectMake(0, 0, 0, 34)];
    imageView.image = [UIImage imageNamed:@"navbg2"];
    self.navigationItem.titleView = imageView;


    // 设置导航栏按钮
    self.navigationItem.leftBarButtonItem = [[UIBarButtonItem alloc] initWithTitle:@"返回"  style:UIBarButtonItemStylePlain target:self action:@selector(leftButtonClick)];


    // 通过系统编辑按钮设置(系统自带的导航专用编辑按钮,点击后变为 Done,再次点击变回 Edit,自带点击响应事件)
    self.navigationItem.rightBarButtonItem = self.editButtonItem;

    self.navigationItem.rightBarButtonItem =[[UIBarButtonItem alloc]initWithBarButtonSystemItem: UIBarButtonSystemItemCamera target: self action: @selector(rightButtonClick)];


    // 通过图片设置,处理阴影,如果直接设置 image 出现阴影,这时候需要设置图片渲染方式 UIImageRenderingModeAlwaysOriginal
    UIImage *image = [[UIImage imageNamed:@"carquery.png"]
    imageWithRenderingMode:UIImageRenderingModeAlwaysOriginal];
    self.navigationItem.rightBarButtonItem = [[UIBarButtonItem alloc] initWithImage: image style: UIBarButtonItemStylePlain target: self action: @selector(rightButtonClick)];


    // 通过自定义视图设置,前两个坐标设置无效,图片会自动压缩
    UIButton *myView = [UIButton buttonWithType:UIButtonTypeCustom];
    myView.frame = CGRectMake(0, 0, 10, 20);
    [myView setBackgroundImage:[UIImage imageNamed:@"Return"] forState:UIControlStateNormal];
    [myView addTarget:self action:@selector(rightButtonClick) forControlEvents:UIControlEventTouchUpInside];
    self.navigationItem.rightBarButtonItem = [[UIBarButtonItem alloc] initWithCustomView:myView];


    // 设置按钮文字颜色,需要先设置按钮才能生效
    self.navigationItem.leftBarButtonItem.tintColor = [UIColor redColor];
    self.navigationItem.rightBarButtonItem.tintColor = [UIColor greenColor];

}
3.5 设置导航条底部线条的颜色
@implementation UIImage (ColorImage)

// 颜色转图片
+ (UIImage *)imageWithColor:(UIColor *)color {
    CGRect rect = CGRectMake(0.0f, 0.0f, 1.0f, 1.0f);
    UIGraphicsBeginImageContext(rect.size);
    CGContextRef context = UIGraphicsGetCurrentContext();
    CGContextSetFillColorWithColor(context, [color CGColor]);
    CGContextFillRect(context, rect);
    UIImage *image = UIGraphicsGetImageFromCurrentImageContext();
    UIGraphicsEndImageContext();
    return image;
}
设置导航栏底部线条颜色:
[self.navigationController.navigationBar setBackgroundImage:[[UIImage alloc] init]  forBarPosition:UIBarPositionAny  barMetrics:UIBarMetricsDefault];
[self.navigationController.navigationBar setShadowImage:[UIImage imageWithColor:[UIColor redColor]]];
3.6 隐藏导航条底部线条
方法一:
- (UIImageView *)getNavBarBottomLine:(UIView *)view {
    if ([view isKindOfClass:UIImageView.class] && view.bounds.size.height <= 1.0) {
        return (UIImageView *)view;
    }
    for (UIView *subview in view.subviews) {
        UIImageView *imageView = [self getNavBarBottomLine:subview];
        if (imageView) {
            return imageView;
        }
    }
    return nil;
}

1
[self getNavBarBottomLine:self.navigationController.navigationBar].hidden = YES;
方法二:
[self.navigationController.navigationBar setBackgroundImage:[UIImage new] forBarMetrics:UIBarMetricsDefault];
self.navigationController.navigationBar.shadowImage = [UIImage new];